Unlock the Secrets to Perfect Korean Braised Lotus Root (Yeongeun Jorim)
Unlock the Secrets to Perfect Korean Braised Lotus Root (Yeongeun Jorim)
Ever wondered how to get that incredibly tender, yet perfectly chewy texture with a beautiful, glossy glaze? You're in the right place!
Hello, everyone! It’s your kitchen confidante here, ready to dive into one of my absolute favorite Korean side dishes: Yeongeun Jorim (연근조림), or Korean Braised Lotus Root. Honestly, for years, I struggled to achieve that perfect balance – sometimes it was too hard, sometimes too mushy, and the glaze? Oh, the glaze was either too sticky or just… not quite right. But after countless attempts and a few grandmotherly secrets (shhh!), I finally cracked the code. And today, I’m thrilled to share everything I’ve learned so you can master this delightful dish right in your own kitchen. Let's make some magic, shall we?
Table of Contents
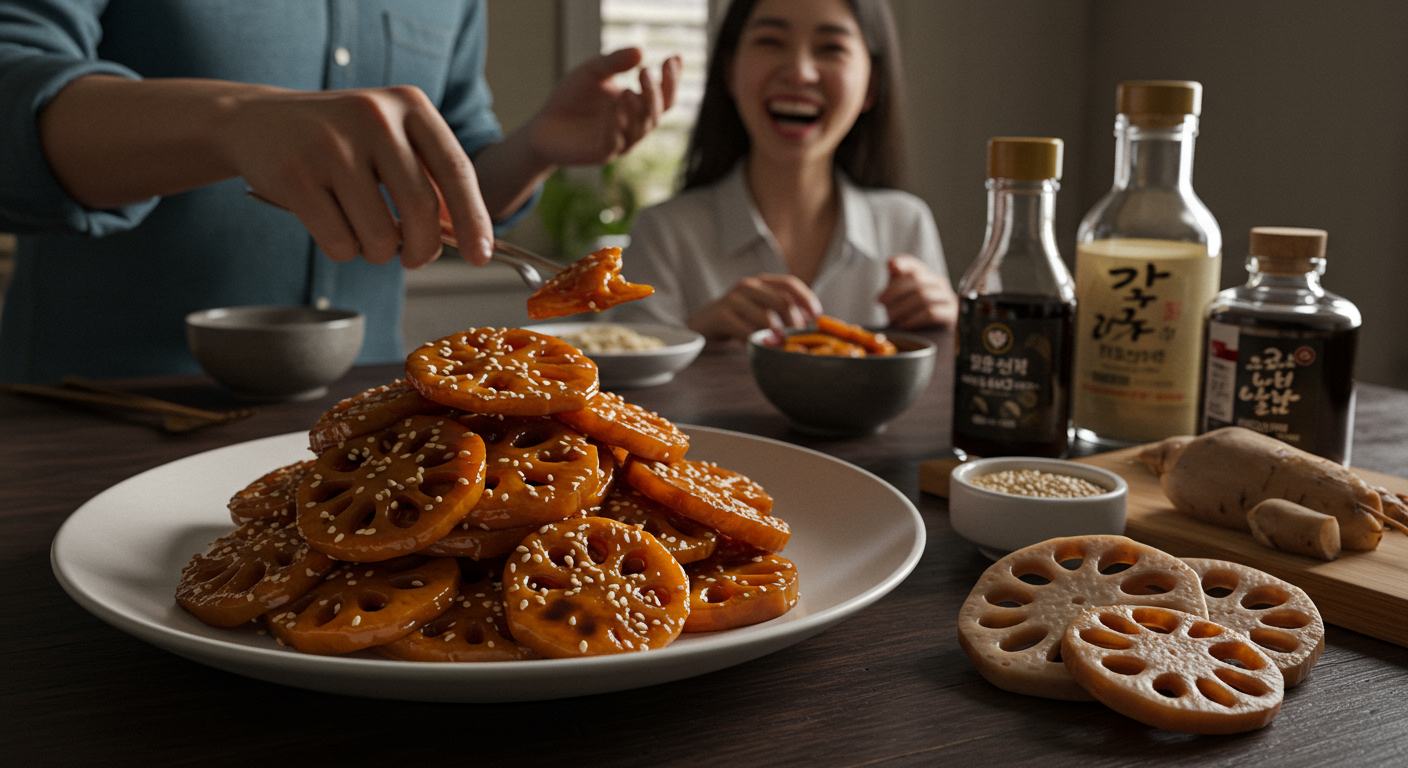 Description: "A beautifully styled shot of a plate of glossy, golden-brown Korean Braised Lotus Root (Yeongeun Jorim), garnished with sesame seeds, on a dark wooden table in a well-lit kitchen. The atmosphere is warm and inviting, in a realistic, food photography style."
Why Yeongeun Jorim (Korean Braised Lotus Root) is a Must-Try
Honestly, when I first encountered lotus root, I wasn't entirely sure what to make of it. It looked... well, interesting. But once I tasted a properly made Yeongeun Jorim, I was absolutely hooked! It’s not just about the incredible flavor – that perfect balance of savory and sweet with a hint of nuttiness – but also the unique texture. It's tender enough to melt in your mouth, yet still offers a satisfying chew. You know what I mean? It's kind of like a culinary paradox, in the best way possible.
Beyond the deliciousness, Yeongeun Jorim is also packed with nutrients. Lotus root is known for being a fantastic source of fiber, vitamins, and minerals. So, you’re not just treating your taste buds, you're doing something good for your body too! It’s a win-win, really. This dish is a staple in Korean households for a reason – it’s often included in lunchboxes (dosirak) because it holds up so well and tastes great at room temperature. Plus, it’s one of those banchan (side dishes) that quietly steals the show on any dinner table. People always ask for the recipe!
Essential Ingredients for Authentic Yeongeun Jorim
Okay, let's talk ingredients! The beauty of Yeongeun Jorim is that it doesn't require a huge list of exotic items. The star, of course, is the lotus root itself. But getting the right kind and knowing what else to pair it with is key. I've definitely made the mistake of grabbing old, dried-out lotus root before, and trust me, it just doesn't work. Freshness is paramount here!
Here’s a quick rundown of what you’ll need. Pay close attention to the lotus root selection – it makes all the difference for that signature chewy-tender texture. And please, don't skimp on the soy sauce; good quality is a game-changer!
| Ingredient | Quantity | Notes for Success |
|---|---|---|
| Fresh Lotus Root (Yeongeun) | ~500g (1.1 lb) | Choose firm, unblemished roots. Look for slightly moist ends. |
| Soy Sauce (Ganjang) | 4-5 tbsp | Use Korean soy sauce for best authentic flavor. |
| Rice Syrup (Mulyeot) or Corn Syrup | 3-4 tbsp | Adds sweetness and that coveted glossy finish. Essential! |
| Sesame Oil (Chamgireum) | 1 tbsp | For aromatic finishing touch. |
| Toasted Sesame Seeds | 1 tsp | Garnish for nutty flavor and visual appeal. |
| Water or Vegetable Stock | 2-3 cups | For braising the lotus root. |
 Description: "A close-up of a kitchen counter showcasing the fresh ingredients for Yeongeun Jorim: sliced raw lotus root, a bottle of soy sauce, a jar of rice syrup, and a small bowl of sesame seeds, all artfully arranged with soft natural lighting, in a clean, modern style."
Step-by-Step: Crafting Your Perfect Braised Lotus Root
Alright, let's get cooking! This is where the magic really happens. I remember the first time I actually got the texture right – I was so proud, I practically ate the whole batch myself. It's a bit of a patient process, but trust me, every minute is worth it for that deeply flavored, tender, and glossy banchan.
Follow these steps closely, and you'll be enjoying authentic Yeongeun Jorim in no time. Don't rush the braising part; that’s where the lotus root really softens and soaks up all those delicious flavors. It’s a labor of love, I guess, but a very rewarding one!
- Prepare the Lotus Root: First, peel the lotus root using a vegetable peeler. It’s pretty straightforward. Then, slice it into about 0.5 cm (1/4 inch) thick rounds. You want them thin enough to cook evenly but thick enough to retain their signature crunch.
- Pre-boil for Tenderness: This step is crucial for achieving that perfect tender texture. In a large pot, add the sliced lotus root and enough water to cover it. Bring it to a boil and let it simmer for about 10-15 minutes. This helps remove any bitterness and starts the softening process. Drain thoroughly.
- Make the Braising Liquid: In a wide, shallow pot or deep pan, combine the soy sauce, rice syrup (or corn syrup), and water (or vegetable stock). Bring this mixture to a gentle boil.
- Braise the Lotus Root: Add the pre-boiled lotus root slices to the braising liquid. Ensure the slices are mostly submerged. Reduce the heat to medium-low, cover the pot, and let it simmer for 20-30 minutes, or until the lotus root is tender. Stir occasionally to ensure even cooking and coating.
- Reduce the Glaze: Once the lotus root is tender, remove the lid. Increase the heat to medium-high and continue to cook, stirring frequently, until the braising liquid has significantly reduced and thickened into a glossy glaze. This can take another 5-10 minutes. Watch it closely during this stage to prevent burning!
- Finish and Serve: Turn off the heat. Drizzle with sesame oil and sprinkle with toasted sesame seeds. Toss gently to coat everything. Serve warm or at room temperature as a delicious side dish.
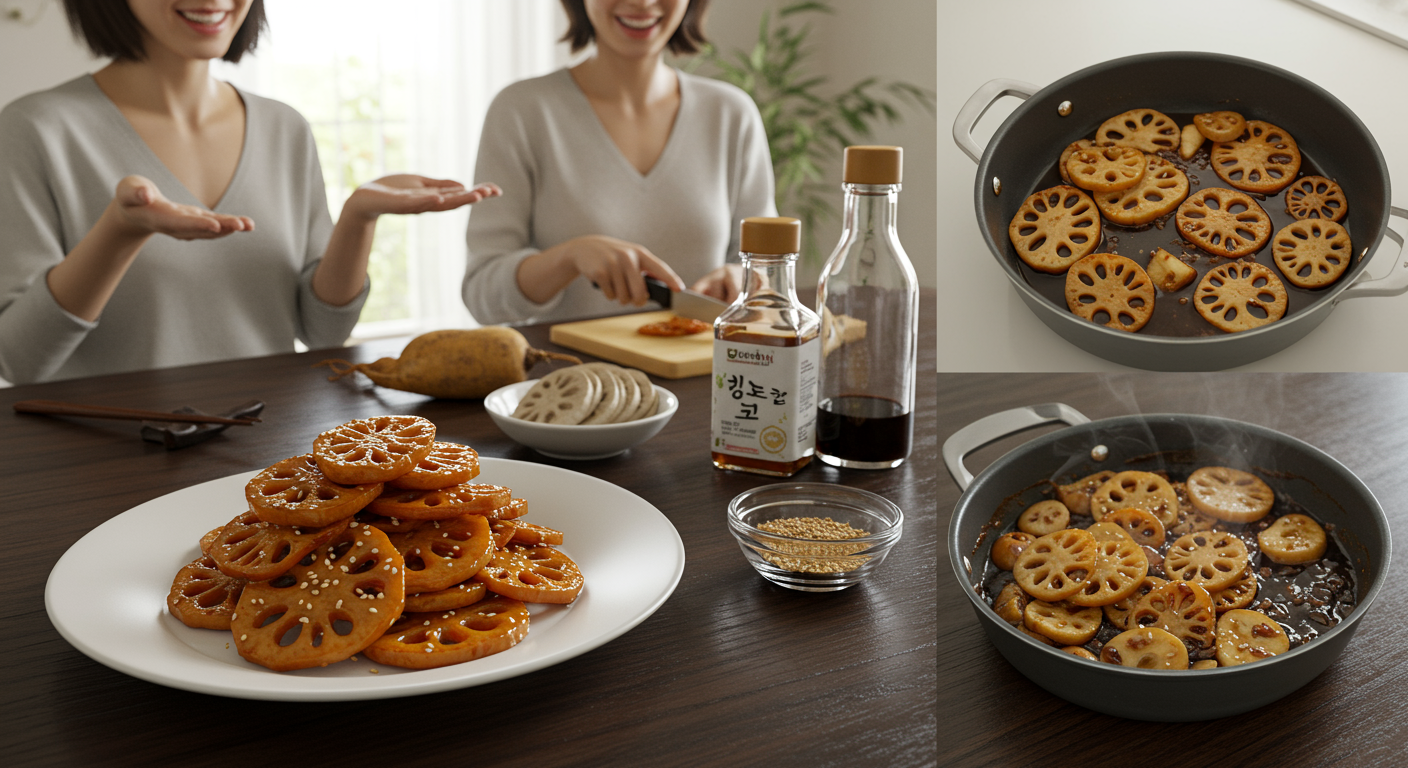 Description: "A top-down shot of a large, shallow pan on a stovetop, with sliced lotus root gently simmering in a rich, dark soy-based braising liquid. Steam is rising slightly from the pan, conveying a sense of warmth and active cooking in a home kitchen setting. Focus on the cooking process."
Mastering the Glaze and Texture: Tips & Tricks
Okay, so you've got the basic steps down, but let's be real, sometimes it’s those little nuances that truly elevate a dish from "good" to "unforgettable." I've been there, staring at my pot, wondering why my lotus root wasn't as glossy or as perfectly tender as my aunt's. After much trial and error (and a bit of nagging my elders for their secrets!), I've gathered some golden tips that will help you achieve that pro-level Yeongeun Jorim.
Remember, cooking is an art, not just a science. Don't be afraid to adjust the braising time or the amount of syrup slightly to match your personal preference for sweetness and tenderness!
- The Vinegar Secret: When you're pre-boiling the lotus root, add a tablespoon of white vinegar to the water. This helps prevent the lotus root from discoloring and also contributes to a slightly more tender bite. It's a small step, but it makes a difference!
- Don't Overcrowd the Pot: Use a wide enough pot so your lotus root slices aren't stacked too high. This ensures they cook evenly and can absorb the braising liquid more effectively. Uneven cooking means some pieces are mushy while others are still hard. No fun!
- Patience with the Glaze: Reducing the liquid takes time, but don't try to rush it by cranking up the heat too much at first. A gradual reduction allows the flavors to concentrate and the glaze to develop that beautiful, sticky texture. Only increase heat at the very end to get that intense gloss.
- The "Resting" Period: After you turn off the heat and add the sesame oil and seeds, let the Yeongeun Jorim sit for 5-10 minutes before serving. This allows the flavors to meld even further and the glaze to set perfectly. It’s like letting a steak rest – essential!
Serving Suggestions & Creative Variations
So, you’ve mastered the art of making perfect Yeongeun Jorim. Now what? The traditional way, of course, is to serve it as a banchan alongside a bowl of rice and other Korean dishes. But hey, who says we can't get a little creative? I’ve experimented a bit myself, and sometimes those little twists can really open up new culinary horizons!
Here are some of my favorite ways to enjoy this versatile side dish, plus a few ideas for jazzing it up a bit if you're feeling adventurous. Don't be afraid to make it your own!
Classic & Beyond: How to Enjoy Your Yeongeun Jorim
- With a Warm Bowl of Rice: This is the default, and for good reason! The slightly sweet and savory lotus root pairs perfectly with plain white or brown rice. It's comfort food at its best.
- Packed in a Dosirak (Lunchbox): As I mentioned, it travels incredibly well. It’s a fantastic addition to any packed lunch, retaining its flavor and texture without needing to be reheated.
- As a Snack: Sometimes, I just pick at it straight from the fridge when I need a little savory-sweet bite. It’s surprisingly addictive!
Twists & Additions for the Adventurous Cook
- Spicy Kick: If you love a little heat, add a teaspoon of Korean gochujang (chili paste) or gochugaru (chili flakes) to your braising liquid. It adds a lovely depth and warmth.
- Nutty Enhancements: Towards the end of braising, you could add some chopped walnuts or slivered almonds for extra crunch and a richer nutty flavor. Just be careful not to overcook them.
- Garlic & Ginger Infusion: Sauté a few minced garlic cloves and a tiny bit of grated ginger in a tablespoon of oil before adding the braising liquid for an extra layer of aromatic flavor. This is for those who really appreciate a bold flavor profile.
See? The possibilities are endless! Don’t be afraid to experiment and find your favorite version. The most important thing is to have fun with it and enjoy the process. Happy cooking, my friends!
Your Questions Answered: Yeongeun Jorim FAQs
I get a lot of questions about Yeongeun Jorim, and I love answering them! It means you're really engaged and keen to get it just right. Here are some of the most common questions I've come across, with my best tips and insights. Hopefully, this helps clear up any lingering doubts you might have. You've got this!
Ah, this is a common one! The most likely culprit is not pre-boiling it long enough, or your slices were too thick. Make sure to simmer the raw slices for at least 10-15 minutes before braising. Also, ensure your slices are no thicker than 0.5 cm. If it's still firm after the initial braising time, simply add a bit more water and continue to simmer until it reaches your desired tenderness. Don't give up!
This usually happens if the braising liquid isn't reduced enough, or if you didn't use enough rice syrup (mulyeot) or corn syrup. The syrups are key for that beautiful shine and stickiness! After the lotus root is tender, crank up the heat a bit and stir continuously until the liquid thickens into a syrup-like consistency that coats the lotus root well. It should almost look like caramel. Be careful not to burn it at this stage – that's when it needs your full attention!
Yeongeun Jorim is fantastic for meal prep! Store it in an airtight container in the refrigerator for up to 5-7 days. It actually tastes even better the next day as the flavors have more time to meld together. Just pull it out and let it come to room temperature, or give it a quick zap in the microwave if you prefer it warm.
While fresh is always best for that ideal texture, you can use frozen sliced lotus root if fresh isn't available. Just make sure to thaw it completely and still go through the pre-boiling step to ensure it softens properly and removes any off-flavors. The texture might be slightly softer than with fresh, but it will still be delicious!
And there you have it! Everything you need to know to make the most incredible Korean Braised Lotus Root (Yeongeun Jorim). I truly hope you give this recipe a try and fall in love with it just as much as I have. It’s a dish that embodies the heart of Korean home cooking – simple ingredients transformed into something truly special.
Don't forget to share your creations with me in the comments below, or tell me about your favorite banchan! I’d love to hear from you. Happy cooking, and see you next time with another delicious recipe!


Comments
Post a Comment